Table Of Contents
SSH tunnel
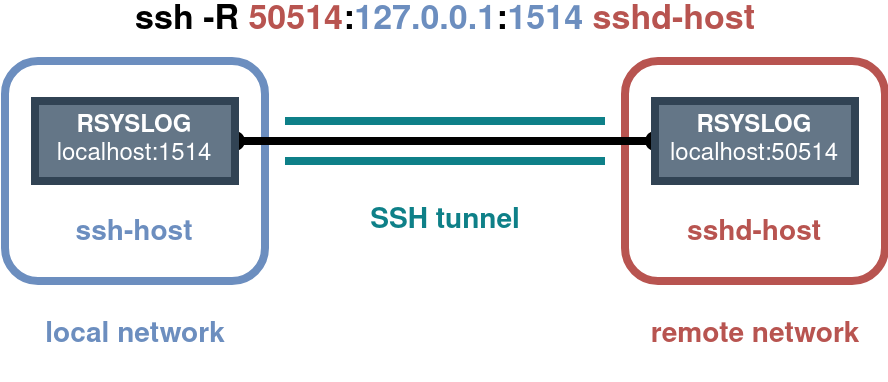
While trying to pull access, error and WAF logs from a remote server, I wanted to try and send syslog events to an on-prem / firewalled syslog server. I found a solution by using port forwarding over an SSH tunnel and making it persistent using systemd.
SSH allows for port forwarding which comes in very handy when one wants to secure inherently insecure/plaintext, TCP-based network protocols like standard syslog. In addition remote port forwarding allows communications to be initiated by the remote machine enabling the local machine to act as a server as well.
Traditional Server-Client terminology can get a bit tricky when dealing with different port forwarding modes (local vs. remote). Therefore I’d recommend reading SSH, The Secure Shell: The Definitive Guide and especially Chapter 9.2, in case you’d like to brush up on this a bit more.1
A vanilla Ubuntu 20.04 machine was used, but should work the same for other distributions. The basic steps for configuration were:
- Create dedicated users.
- Setup key-based SSH connectivity.
- Test remote port forwarding.
- Create Systemd service file(s) to start the tunnel(s).
- Create Rsyslog configurations to forward over / listen on the tunnel(s).
The following block describes step 1-3, step 4 and 5 have their own sections further down below. For this first part you can also take a look at this helpful article by Blackhole Networks.2
# Create dedicated users on both ends.
adduser rsyslog-remote
# Lock the users from direct password based logon.
usermod -L rsyslog-remote

# Create ssh keys for both users on each end of the tunnel.
cd ~rsyslog-remote
sudo -u rsyslog-remote ssh-keygen

# Copy the public key from the local to the remote machine.
scp /home/rsyslog-remote/.ssh/id_rsa.pub user@remote-ip:

# Setup key-based access on the remote machine.
cat /home/user/id_rsa.pub >> /home/rsyslog-remote/.ssh/authorized_keys
chown rsyslog-remote:rsyslog-remote /home/rsyslog-remote/.ssh/authorized_keys
chmod 600 /home/rsyslog-remote/.ssh/authorized_keys

# Test Reverse SSH tunnel on the local machine.
# -N Disables remote command execution .
# -n stdin redirect. Needed for tunnels created in the background.
sudo -u rsyslog-remote ssh -nN -R <remote-port>:<local-ip>:<local-port> <remote-ip>
sudo -u rsyslog-remote ssh -nN -R 50514:127.0.0.1:1514 <remote-ip>

# This final command leaves out the remote interface.
# By default the remote loopback-interface is used and not any other interfaces.
# However you can easily add it if needed.
ssh -nN -R <remote-ip>:<remote-port>:<local-ip>:<local-port> <remote-ip>
Note: This is creating a remote forwarding tunnel. In more common scenarios a local forwarding tunnel could be used. While the main difference in the command is changing the
-R-flag to a-L-flag, the meaning / order of the ports and interfaces changes. Again, please read up on the differences ^_^.1
Systemd
The next step was to persist the tunnel and easily create new ones if needed. Two gists on GitHub were especially helpful while creating this and can be seen here and here.3 4
The first thing is to create a Systemd service file on the local machine using your preferred naming convention (e.g /etc/systemd/system/secure-tunnel@.service) and add the below content.
An EnvironmentFile statement is used to make the service generic. It refers to files conforming to a specific filename-convention which contain the values of the used variables in the ExecStart statement (e.g. REMOTE_PORT and LOCAL_ADDR). This enables one to add a new port forwarding service by creating a new config file for it.
[Unit]
Description=Setup a secure tunnel to %I
After=network.target

[Service]
EnvironmentFile=/opt/tunnels/secure-tunnel@%i
ExecStart=/usr/bin/sudo -u rsyslog-remote /usr/bin/ssh -nN -R ${REMOTE_PORT}:${LOCAL_ADDR}:${LOCAL_PORT} ${REMOTE_ADDR}

# Restart on failure.
RestartSec=10
Restart=on-failure

[Install]
WantedBy=multi-user.target
Note: You might not want to retry setting up the connection every x seconds indefinitely when the tunnel fails. The Restart stanza comes with 2 accompanying parameters (StartLimitIntervalSec / StartLimitBurst) that control rate limiting behavior.5
The next step is setting up the needed configuration file using the chosen filename-convention defined in the EnvironmentFile stanza (e.g /opt/tunnels/secure-tunnel@myhostname.com) and adding the following content to it. Adding another file with different parameters allows for a second service to be created.
LOCAL_ADDR=127.0.0.1
LOCAL_PORT=1514
REMOTE_ADDR=myhostname.com
REMOTE_PORT=50514
Now one can control the tunnel(s) by starting / enabling them:
# Start the newly created service.
systemctl start secure-tunnel@myhostname.com
systemctl status secure-tunnel@myhostname.com

# Enable if everything is looking well.
systemctl enable secure-tunnel@myhostname.com
Note: Some notes for improvement might be to add variables for a remote user or SSH options, add aliasing and other configurations to
~/.ssh/configand integrating autossh in the servicefile.
user@host:~# systemctl status secure-tunnel@myhostname.com.service
● secure-tunnel@myhostname.com.service - Setup a secure tunnel to myhostname.com
     Loaded: loaded (/etc/systemd/system/secure-tunnel@.service; enabled; vendor preset: enabled)
     Active: active (running) since Fri 2021-08-13 09:29:41 UTC; 1h 1min ago
   Main PID: 5840 (sudo)
      Tasks: 2 (limit: 9257)
     CGroup: /system.slice/system-secure\x2dtunnel.slice/secure-tunnel@myhostname.com.service
             ├─5840 /usr/bin/sudo -u rsyslog-remote /usr/bin/ssh -nN -R 50514:127.0.0.1:1514 myhostname.com
             └─5841 /usr/bin/ssh -nN -R 50514:127.0.0.1:1514 myhostname.com

Aug 13 09:29:41 host systemd[1]: Started Setup a secure tunnel to myhostname.com.
Aug 13 09:29:41 host sudo[5840]:     root : TTY=unknown ; PWD=/ ; USER=rsyslog-remote ; COMMAND=/usr/bin/ssh -nN -R 50514:127.0.0.1:1514 myhostname.com
Aug 13 09:29:41 host sudo[5840]: pam_unix(sudo:session): session opened for user rsyslog-remote by (uid=1234)
Rsyslog
The final part of the puzzle is configuring Rsyslog to forward to / listen on the configured ports of the SSH tunnel. The following snippets are some bare-bones Rsyslog configuration stanzas to read from a file (e.g. Modsecurity WAF logs), send them to the SSH tunnel, receive log events on the other end of the tunnel and write them back to file.
Remote Rsyslog Client Configuration (bare-bones)
Local Rsyslog Server Configuration (bare-bones)
Conclusion
There we have it, all parts are working together. This allowed me to brush up on SSH, port-forwarding, Systemd Unit files and enabled me to grab my valuable log files from remote servers in a real-time, streaming way.
See the below recording to see the tunnel in action. A test inject triggers the WAF, which causes a log to be sent over the tunnel (full-screen for full tmux session).